One of my first tasks was to make our docker build faster and I wanted to get a
list of all of our services that are based on python in order to start with
them.
I asked one of my co-workers if he has a script to do that. Sure enough he had
a make file that I tweaked a bit.
Here it is
all:
force:

token=<your-github-token>
user=<your-github-username>
org=<your-github-organization>

auth_opt=-u $(user):$(token)

# note: not all repos are in there!  hitting the page limit of 30.
x.repos.json:  force
                curl -Ks $(auth_opt) https://api.github.com/orgs/$(org)/repos?per_page=100 \
                > $@

clone-all: x.repos.json
          cat x.repos.json \
          | jq -M -r '.[]|.ssh_url' \
          | while read url; do (test -e $$(echo $$url | sed 's|.*/\(.*\)\.git|\1|') || git clone $$url ); done

list-all: x.repos.json
          cat x.repos.json \
          | jq -M -r '.[]|.ssh_url' \
          | while read url; do (echo $$url); done

pull-all:
          for d in ./*; do echo $$d; (cd $$d; git pull); done
<your-github-org>: Most likely company name for us it’s globality-corp
What I have is a directory called ~/Code/globality, in it’s root I have this
Makefile and I do make clone-all in order to clone all repositories and I can
also do make pull-all to pull all the recent changes across the repositories.
For the last month or so, I have been live streaming myself coding my day to
day tasks on Twitch, LiveEdu, and Youtube
It’s been a really fun experience but I feel there should be something tying
everything together. One single long-running project can do that.
A little while ago, Stephens and I had an
idea for an app we could pair on as a learning experience for him (We worked
for the same company at the time). We didn’t end up working on it together and
we decided we’re going to do it while live streaming and pairing.
The application
The application is called “The Creative Network” and it as a place where you
can share your creative space for inspiration and for people with the same
hobby to find inspiration.
For example, say you want to share your awesome home office. You can take
pictures, add some description and so on.
So far, nothing special, the really cool feature is that you’ll be able to tag
the images with product links, and people will be able to buy the products
right from your page.
Right now, we are planning on doing this 3 times a week between 9:30pm and 11pm
PST. You can watch it live then OR you can watch the Youtube channel at your
own time. Whatever you decide to do, please participate, ask questions and be
involved.
Ever since I started streaming to 3 platforms, I faced the problem of updating
the channel title, description and other information.
You have to open the browser, go into each page and update the data, even
though it is essentially the same.
Example screenshots
Youtube
LiveEdu
Twitch
The solution
I want to have a single place where I update the title and the description
locally.
Let’s say I want to do something like ./stream new, this will create a yaml
file where I will update all of the information. One I update the information,
I do ./stream submit {filename.yml} and that’s it.
The technlology / language
As with any project that is a cli, I choose to go with Golang. I feel it is the
easiest and most friendly for this type of project.
Golang
Yaml
Youtube API
Twitch API
LiveEdu API
As always, please feel free to ask questions and add your comments during the
stream
One of the first best practices I started using when coding with Golang is have
the method arity accept the top interface and not the specific class/struct.
This means, that as long as your type satisfies a specific interface, you can
treat your go code as pretty dynamic.
I want to walk though a specific implementation of this I recently had to do
with one of my projects.
The project
I needed to clone a database daily from the latest snapshot of production
database. In order to do that I needed to use the go-aws SDK.
Here’s the code
func (r *RDS) getLatestSnapshotId() (string, error) {
	input := &rds.DescribeDBSnapshotsInput{
		DBInstanceIdentifier: r.Config.DBName,
	}
	output, _ := r.Service.DescribeDBSnapshots(input)

	if len(output.DBSnapshots) == 0 {
		return "", fmt.Errorf("Didn't find any snapshots for %s", r.Config.DBInstanceIdentifier)
	}

  // REST OF CODE HERE
}
output here is of type DescribeDBSnapshotsOutput which contains a slice of
snapshots with a timestamp field called SnapshotCreateTime.
Implementing the sort
Diving into the sort documentation here: https://golang.org/pkg/sort/ we see that sort.Sort accepts a data Interface which looks like this:
type Interface interface {
        // Len is the number of elements in the collection.
        Len() int
        // Less reports whether the element with
        // index i should sort before the element with index j.
        Less(i, j int) bool
        // Swap swaps the elements with indexes i and j.
        Swap(i, j int)
}
All I need to do is implement this interface on a type and pass it to sort.Sort, lets dive into this.
You can see here that SnapshotSlice holds a reference to the original rds.DBSnapshots and that’s what we’re going to use.
First method we need to implement is Len()
func (p SnapshotSlice) Len() int {
	return len(p.Snapshots)
}
Pretty straightforward, we just “delegate” the len to the original slice.
The next is Less(), which is a bit more “complicated” but we can explain it
simply by:
The method accepts to indexes on the slice, you need to say whether i is
“bigger” than j remember these since you’ll need to swap the position later.
func (p SnapshotSlice) Less(i, j int) bool {
	t := *p.Snapshots[i].SnapshotCreateTime
	o := *p.Snapshots[j].SnapshotCreateTime
	return t.Before(o)
}
I can use t.Before(o) since the data type for that field is Time, this
saved me a parsing phase if the original library would have returned these as
strings for example.
The last method is Swap which basically swaps one with the other
Now, I get a sorted slice which I can grab the first item and it’s the latest
snapshot.
Conclusions
Before going into Golang a lot of people have the wrong concept that because
it’s strongly typed you lose a lot of dynamic support. In a way, that’s true
but it’s still not as limiting as you think.
In order to do that, you need to adapt with methods arity that accept the
higher Interface and not the specific type.
When you use a library and it doesn’t do what you want, you can wrap the
libraries objects with your own that implement any method you want and use that
for the rest of your code.
Thank you
Hope you enjoyed reading and this helps you with your code/work.
Today I started a new experiment. I am going to be live-coding some of the many
things I do in my day to day work.
I will blog soon on the reasons for doing this.
During the coding session I encountered a problem where webpack dev proxy is
not working with the puma rack server.
I created a mini go based HTTP server and I verified that this is actually
working for another server first, that’s how I isolated that it’s actually puma
related and not something in webpack or my configuration.
Here’s a sample of the configuration, just for reference:
Turns out with the puma web server this will fail since puma will not bind to 127.0.0.1 and the webpack proxy is likely resolving localhost to 127.0.0.1.
In order to fix this, when you run your rails server, just run it with the -b
option to bind it to 127.0.0.1 like so: rails server -b 127.0.0.1.
That’s it, now you can enjoy working with webpack and puma as your rails-api
rack server.
If you’ve been following me online, even just for a couple of weeks you’d know that I’m rewriting a major and critical application using React-Redux.
At Gogobot, we A/B test quite a bit and we track behavior in order to make sure what we deliver to our users is top notch quality and not confusing.
One of the most used services around the Gogobot office is Mixpanel which allows you to track custom events with any payload and graph it. You can check with version of your application is behaving better and which does the user like better.
Before React-Redux, we had buttons around the site with .mixpanel class. If one of those button was clicked we would fire the event and listen to it.
Since with React we got rid of jQuery, I wanted to make sure we have a scalable way to do it.
Higher Order Component to the rescue
I’ve written about Higher Order component in the past, feel free to go there and read on if you’re not sure what it means.
For this, a Higher Order Component really fit. Ideally I’d want something like this.
MixpanelButon component with a trackEvent function. The “child” component (a) in our case will hold data-mixpanel-eventname and data-mixpanel-eventproperties (JSON). Once clicked it will fire the trackEvent function that will fire the actionCreator.
Getting started
Middleware
In order to connect to mixpanel I found this handy mixpanel middleware that does precisely what I want redux-mixpanel-middleware.
All you need to do is dispatch an action with the mixpanel object and the rest is taken care of in the middleware.
Action Creator
import * as actionTypes from '../constants/actionTypes';

export function sendMixpanelEvent(eventName, mixpanelParams = {}) {
  return function(dispatch, getState) {
    let params = mixpanelParams;

    if (typeof(params) === 'string') {
      params = JSON.parse(params);
    }

    dispatch({
      type: actionTypes.MIXPANEL_EVENT,
      meta: {
        mixpanel: {
          event: eventName,
          props: Object.assign({}, params)
        }
      }
    });
  }
}
As you can see it’s pretty simple, I am just dispatching a MIXPANEL_EVENT with the meta object (that’s being taken care of in the middleware). eventName is passed into the creator and the params are either an object OR a JSON string.
I could have also parsed the JSON before I dispatched the action but I figured the API will be cleaner with accepting an object or JSON. Matter of taste here I guess…
The Higher Order Component
import React, { Component } from 'react';
import ReactDOM from 'react-dom';
import { connect } from 'react-redux';
import { sendMixpanelEvent } from '../../actions/mixpanel';
import { bindActionCreators } from 'redux';

function MixpanelButtonWrapper(ComposedButton) {
  class MixpanelButton extends Component {
    render() {
      return(
        <ComposedButton
          { ...this.props }
          { ...this.state }
          trackEvent={ this.props.track } />
      );
    }
  }

  function mapStateToProps(state) {
    return {
    };
  }

  function mapDispatchToProps(dispatch) {
    return {
      track: (e) => {
        const target = e.target;
        const eventName = target.getAttribute("data-mixpanel-eventname");
        const eventAttributes = target.getAttribute("data-mixpanel-properties");

        if (eventName && eventAttributes) {
          dispatch(sendMixpanelEvent(eventName, eventAttributes));
        }
      }
    };
  }
  return connect(mapStateToProps, mapDispatchToProps)(MixpanelButton);
}

export default MixpanelButtonWrapper;
This is the higher order component called MixpanelButton and it’s being wrapped by the MixpanelButtonWrapper function that returns the component.
It’s passing a track prop through the mapDispatchToProps function and that is being passed down into the ComposedButton as trackEvent prop.
The button itself is also simple, it’s just an a tag that has an onClick event that fires the trackEvent with the event as a param.
As you can see at the very bottom of the component, I am wrapping the component with MixpanelButtonWrapper.
Now, every button I want to have Mixpanel on, I can do the same thing. Very easy to do and figure out. It’s not as simple as just adding a class like we had previously but it’s simple enough for the use-case.
One more thing…
We don’t really have to pass trackEvent as a prop to the ComposedButton component. Since we spread all the props in {... this.props} the ComposedButton component has access to track as part of it. It’s really a more verbose self documenting way of knowing what the event is.
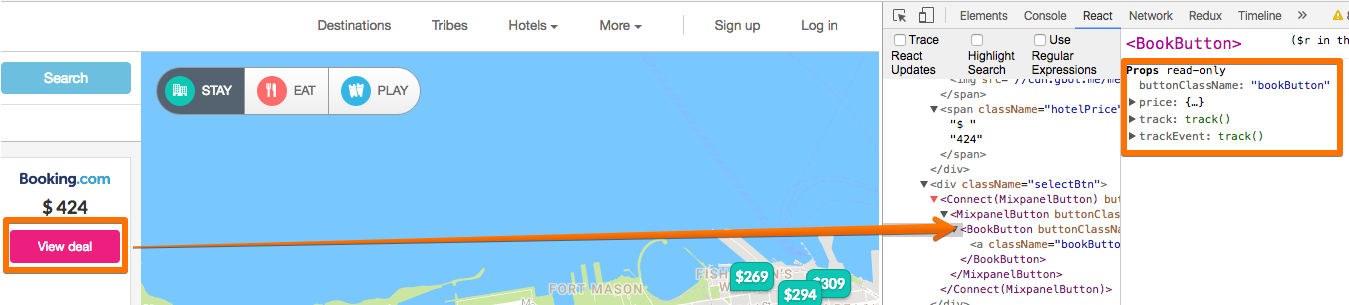
In action
You can see the button accepting the params as expected. When I click the button the params from the data- attributes are bring pulled in and passed to the action creator and later sent to Mixpanel.
Summary
To sum up. You can have common behaviors in your React applications if you use the code right and connecting those common behavior to Redux is also not a big issue.
I am really having a lot of fun working with the React-Redux combination. Feel free to add your comments and ask questions.
Recently I’ve started using React and Redux to rebuild one of the major components on the Gogobot website.
In order to understand the problem better, here are some screenshots of one of the components on that page.
Without really understanding the ins and outs of the component, you can see that the components share many things:
Count label that is shown/hidden based on the number of items I selected from the filter.
Drop down that opens on click of the icon.
Once clicked, it sends an event (action) and requests the data from the server based on the new filter.
Sitting down to design this component I realized that the behavior shared between each of them calls for a higher order component that will define the behavior and wrap all “child” components.
Doing this with pure React is fairly obvious so I’m not gonna go into that, this post is gonna be about doing this with Redux since the higher-order-component is connected to the dispatch, store and state.
We’re creating a function that wraps a component and defines some behavior. This is shared behavior to all the wrapped components. In this example we only have the count label for the sake of example but you can obviously extend it to whatever you can.
Let’s take a look at the wrapped component (HotelClass) for this example
As you can see, when the checkbox changes, it’s calling this.props.onCheckboxChange which is coming from the higher order component and in turn will call the behavior there.
The final lines are the “magic” ones, I pass some filterInfo which you can use any way you see fit (or not), and I pass the HotelClass component wrapped in BaseFilterWrapper function.
Now, lets implement the logic to show the count label when we click the checkboxes and hide it if the count is 0
onCheckboxChange(e) {
	let { count } = this.state;
	var { checked, value } = e.target;

	if (checked) {
	  count += 1;
	} else {
	  count -= 1;
	}

	this.setState({
	  count
	});
}
That’s about it.
Now, you can share similar component logic.
Benefits
The clear benefits of this approach is that if you have a share behavior for a set of components, you only connect the “base” to the store and you manage everything from it. The rest of your components are just “dumb components” and the get injected with the behavior.
The code is much cleaner and there’s a single point of entry for actions/state changes to the system, this simplifies debugging and testing a lot and overall makes the code more readable.
No 'Access-Control-Allow-Origin' header is present on the requested resource. Origin 'http://localhost:8080' is therefore not allowed access. If an opaque response serves your needs, set the request's mode to 'no-cors' to fetch the resource with CORS disabled
This is caused by Javascript trying to access a web server not on the same origin. For example http://localhost:8080 trying to access http://localhost:3000.
You can override this by allowing cross origin access, but that’s not usually a good idea.
The best way to go around it is to make your local same as production, your client application and the server are on the same origin.
In production, this is usually handled by Nginx or any other web server, on your local, you can use Webpack in order to achieve this.
So, for example, anything with /api/v5 prefix will be proxied to your web server.
In your devServer segment of your webpack.config.js you can simply add this:
    proxy: {
      '/api/v5*': 'http://localhost:3000'
    }
This basically means that whenever you have a request going to /api/v5/something it will be proxied through your local web server (Rails in my case).